We started no-tilling in the early 2000s and in 2010, started strip-tilling before we went full-bore into it in 2013 and eliminated all conventional tillage. In 2017, we completely eliminated broadcast fertilizer applications and went 100% strip-till for both corn and soybeans which was a goal that I set in 2013.
Now that we’ve made the transition to strip-till from conventional tillage, we're expecting a lot more out of our equipment. We're running in much tougher conditions and going to find those flaws in the field earlier in the season.
Our mistakes are spread across more acres. Just one little mistake like a broken spring on a closing wheel or something like that, can cost valuable time and money.
I'm sure every single one of us has planted 80 acres, then stopped to fill up with seed, walked around the planter and wondered ‘Did that spring fall off the last pass or was it two fields ago?’ Breakdowns cost a lot of money.
So here are a few tips and lessons learned from my experience preparing for planting and trying to prevent and plan for potential problems before I get into the field.
1. Disc Openers
In my opinion, disc openers get overlooked a lot more than they should. I can't tell you how many farmers, at least in our area, will run a planter 4-5 years and never even put openers on the row units.
They are relatively cheap for what they're doing. We try to replace them at least every other year. We also want to check the seed tubes, especially at the bottom, which can cause wear at the bottom and the tube will start dropping the seed in the trench prematurely.
New openers are 15 inches and we like to replace them around 14½-inches. Unfortunately, they might not get to 14½ inches until the middle of the season. So just automatically replace them every other year.
I like to use the business card trick for the clearance. Slide a business card in the top side and the bottom side and it should measure right about 1¾ inches. That's a pretty important step because if those openers are too far apart, you're going to have soil sneaking through and have like a funny shaped seed trench.
Even if you don't replace your openers every year, or every other year, we always take off all of our gauge wheels and re-shim the openers every year. You'd be shocked at how much of a difference that makes.
2. Closing System
We put so much work into having a nice row cleaner that clears a path for putting the seed in the ground. I can't tell you how many times I've seen planters with row units that either have weak closing springs of they have smooth wheels that aren’t adequate for the environment. They should have some sort of a notched system to properly close the seed trench.
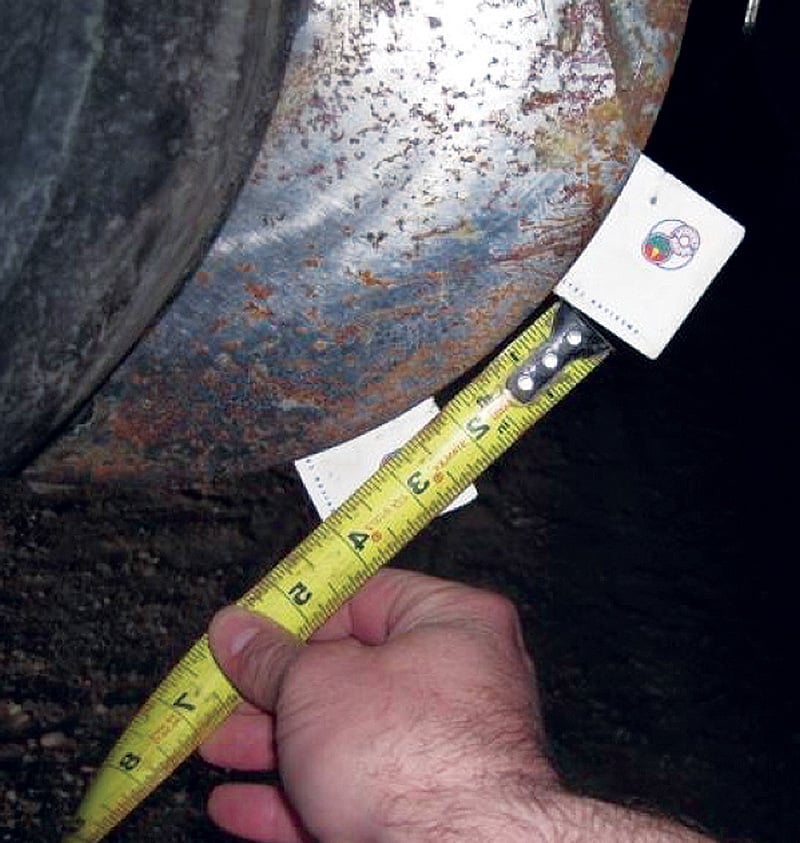
MEASURE UP. Strip-tiller Dave Delhotal likes to replace disc openers when they wear to about 14½-inches, which may not occur until the middle of the planting season. Otherwise, he’ll replace them every other year.
I recommend thoroughly inspecting the closing system. Check the actual alignment of the closing wheels with the disc openers. In addition, take your closing wheel frame and kind of wiggle it back and forth.
Check for wear. There are replacement bushings that you can use to tighten it back up. Also, there's a pin that holds the adjustment arm for the spring. We’ve had problems with that pin popping out and then there's basically no pressure in the closing wheel and it’s not closing the seed trench.
“Disc openers get overlooked a lot more than they should. I can’t tell you how many farmers, at least in our area, will run a planter 4-5 years and never even put openers on the row units…”
There’s a little cotter pin that holds the pin in and I like to replace those cotter pins every year because as it sits there and works and works, that cotter pin gets thinner and thinner and eventually, that that pin will just drop out, your spring will drop to the ground and you won't have any closing downforce.
If the rubber on your closing wheels is getting worn, at least in the side-by-sides that we've done, I would highly suggest looking into some sort of a spiked closing wheel. We always try to plant in perfectly ideal conditions, but we find that our fields are never 100% fit. It's always about 95% and the thing I like about those spiked closing wheels is it allows you to do a really good job of closing the seed trench no matter the conditions.
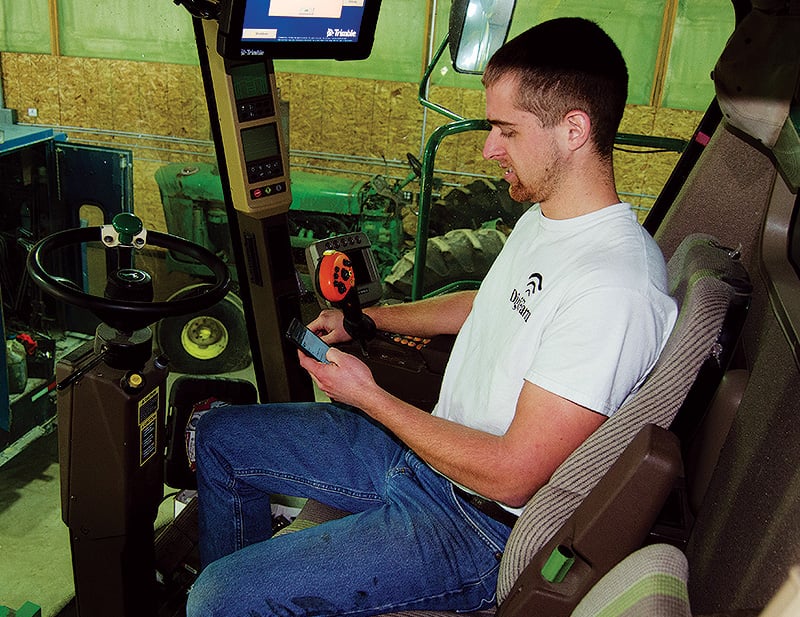
SYSTEMS CHECK. Pre-running precision farming systems prior to planting is an essential step to avoiding technical difficulties in the field. Dave Delhotal recommends doing the proper planter calibrations, backing up field data from in-cab displays and test running seed meters in advance.
Another important part of your adjustments and checklist is the gauge wheel-to-opener clearance. When you get in certain conditions, you can get build-up inside of that gauge wheel. Usually during the day, it's fine. Something usually happens at about midnight and it's usually the row right behind the tractor where you can't see it, until you turn around and see that you've got one gauge wheel plowing the field.
Be Precise with Your Precision Checklist
While a front-to-back inspection of your planter is essential to limit the potential for in-field problems, so is an evaluation of precision farming systems that are critical to peak performance.
West Brooklyn, Ill., strip-tiller Dave Delhotal offers some experience-based advice on getting your displays, guidance and calibrations all set before planting a single seed.
“I always like to go into my displays, check the overall measurements, front, back, side-to-side,” he says. “If you’ve got a planter that likes to drift one way or another, you need to put an offset in there.
That’s important to check because incorrect measurements will have a direct effect on your planter performance, whether it’s section control, row clutches or auto-steering. I can’t tell you how many times I’ve dealt with a farmer who had problems with their guess rows and come to find out that they have a 6-inch offset where is should be 0 in their display.”
Delhotal also recommends checking planter drive calibrations by running an output test of 30 seeds per acre. “The drive will spin the disc once and you can count your seeds and double check to make sure the system is performing as it should,” he says. “That’s especially important if you are variable-rate planting because if your calibration is off and you can’t plant a straight rate of 36,000 seeds per acre, when you vary up or vary down, you will be either under-seeding or over-seeding.”
Finally, Delhotal says it’s important that after calibrations are done, be sure to back up the display settings on a flash drive. He will download 2 backups of every implement calibration, one on a flash drive and another on a cloud-based platform.
“We run Trimble systems and Precision Planting mostly, and they all have a screen where we can go in and manually run the planter in the yard and set a target seeding rate and a target speed,” he says
I always like to set that clearance at about an eighth-of-an-inch or so. That requires taking the wheels apart, and checking that every single year. It might seem like overkill, but if we don’t do it, we’ll regret it later and end up re-shimming our gauge wheels when we're out in the field.
3. Seed Meters
This might seem basic, but get your meters run by a person who knows how to do that. The person who does ours, makes a laminated book that shows row-by-row of what each meter ran, and what he replaced. It’s reassuring to have someone that thorough test them.
4. Drive Settings
Check, double-check and triple-check your measurements for your clutch settings and your drive settings. My top tip is once your planter profile is set up, grab a flash drive and back it up because you never know if your display is going to crash when you are in the field. Rebuilding that whole entire planter profile in the middle of the season is not fun.

“If you have a hydraulic hose or a fertilizer tube that contacts the frame, I always take a little piece of 3/8-inch sprayer hose and wrap it around it. For our fertilizer tubes without that little piece of hose, it’s going to rub on a bolt back and forth until you have a pinhole which will ultimately create a mess…”— Dave Delhotal
And usually in my experience, it does not get done correctly whenever you're trying to hurry to get something set back up. Also, make sure all your hybrids, clients’ field, etc., are loaded on your display before you even start.
It's easier to load your hybrids, for example, in advance rather than trying to do it in the season then all of a sudden you've got different, funky names for your hybrids because you're in a hurry and uploaded them incorrectly.
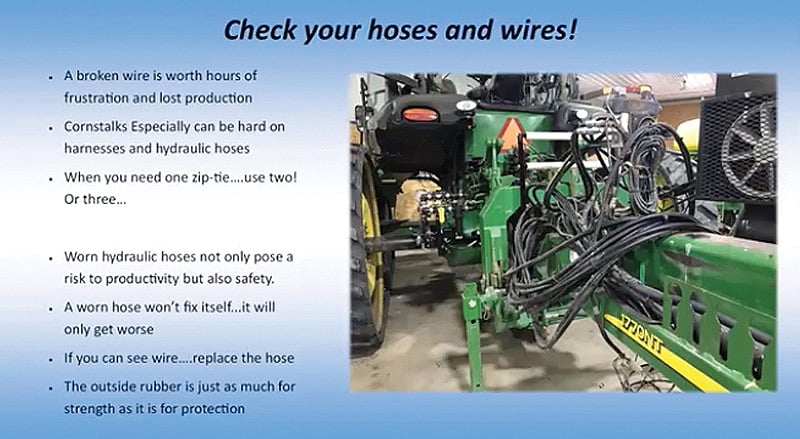
5. Hydraulic Hoses
Planters still have a lot of hydraulics, and we keep adding more stuff every year. By the time we get one or two liquid fertilizer products, we're pushing 60-65 gallons of fertilizer a minute through those systems.
It really doesn't take long to empty a tractor whenever you blow a hose. I had that unfortunate experience several times, so make sure your fertilizer application systems are in top-notch condition. It's easier to find leaks with water than it is with 32% nitrogen (N).
Get more tips, tricks and techniques to prepare for planting, including strip-till rig maintenance and post-planting objectives in this exclusive webinar with West Brooklyn, Ill., strip-tiller Dave Delhotal. Visit www.StripTillFarmer.com/plantertips.
I inspect all my hydraulic hoses really closely because manufacturers have hydraulic hoses routed inside the frame, as well as outside the frame and there's a lot of different points that can wear the outside of that hose off. My rule of thumb is if you can see the wire, replace the hose because the rubber is there to protect the wire, but also does provide some strength, especially if you're working with liquid fertilizer. The second that fertilizer hits it, the wire is going to start rusting and you're going to have a mess on your hands.
Despite our best efforts, we still blew at least one hose on each planter one spring and went through probably 60-80 gallons of hydraulic oil between the two, so it can be an expensive breakdown.
Another practice I recommend is if you have a hydraulic hose or a fertilizer tube that contacts the frame, I always take a little piece of 3/8-inch sprayer hose and wrap it around it. For our fertilizer tubes without that little piece of hose, it’s going to rub on a bolt back and forth until you have a pinhole which will ultimately create a mess.
If you've got a harness that's hitting corn stalks all day and then all of a sudden you've got a wire that's loose and a Deutsch connector, you could spend 7 or 8 hours just to find a loose pin and connector that really could have been prevented by having the harness up out of the way.
If you think you need 1 zip tie on that harness, use 2 or 3. Out of curiosity, I kind of kept track of how many zip ties we went through one winter in the shop. I think we went through about 4,000 zip ties on both of our planters.
We've got these really expensive, advanced tractors and planters, but I've always struggled with ‘What are we supposed to do with all the hydraulic hoses and wires?’ We all have a tarp strap on our 3-point hitches where we tie hoses up. So if we zip tie all of those hoses from the start, we’ll put ourselves in good position to avoid problems in the field when we should be planting.
Always be observant of your hinge points and try not to route any extra hoses, wires or anything like that where it's going to get pinched or torn. My motto is ‘A clean install stays clean.’
Learn More
15 Time, Money & Stress-Saving Strip-Till Planting Tips
Creating the ideal seedbed requires diligent residue management, the right precision tools and a willingness to get your hands dirty.