Last updated March 31, 2021
Strip-tillers often talk about the need to be more sensible with their seed placement, planter setups and precision tech savvy to create an increasingly responsive environment for initial plant growth.
But how are farmers turning those several inches of optimal planting space into higher yields and lower seed costs? Hitting — or missing — that target planting zone can be the difference between a bumper crop and disappointing yields.
Strip-Till Farmer editors assembled 15 strategic tips to consider ahead of getting into the field and ensure that those strip-tilled berms will translate into ideal seedbeds.
1. Speed Limit
Too much planting speed can impact seed placement and depth. While high-speed planters and attachments are now available — allowing strip-tillers to plant at speeds up to 10 mph — strip-tilled fields can be rough, so be cautious about ground speeds above 5 mph to reduce row unit bounce and drop seeds uniformly.
Proper seed spacing is also an important factor to achieve optimal corn yields, especially on variable soils and contours, where seed spacing can vary by up to 15%.
2. Gauge Wear and Tear
As gauge-wheel pivots wear, they pull away from the disc openers. Worn pivots will create messy seed trenches. As blades wear and separate, this can result in a ‘W’ profile in the bottom of the seed slot. When blades are new, they cut like one and make a ‘V’ with an acute angle, which is ideal to press seeds into the furrow with seed firmer.
As blades lose their edge and move apart, the soil contact point changes and it’s more difficult to penetrate hard ground and cut through heavy, damp residue.
3. Clutch Measurement
Check, double-check and triple-check measurements for planter clutch settings and drive settings. “My top tip is once your planter profile is set up, grab a flash drive and back it up because you never know if your display is going to crash when you are in the field,” says West Brooklyn, Ill., strip-tiller Dave Delhotal. “Also, make sure all your hybrids, clients’ field, etc., are loaded on your display before you even start. It’s easier to load your hybrids, for example, in advance rather than trying to do it in-season.
4. Vary Depth
Be aware that setting each row unit to the same depth doesn’t mean they all are planting the same depth. Differences in manufacturing and wear will cause depth variation by row. Check this is by placing some lumber under the gauge wheels, lowering the planter, and measuring the actual planting depth. Replace worn parts and adjust the depth correctly on each row because depth variation will cause uneven emergence between your rows, resulting in poor stands and lost yield.
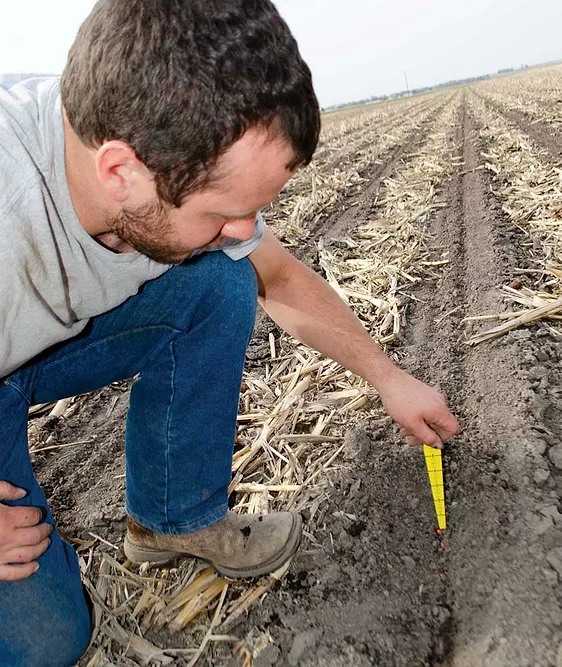
GAUGING DISTANCE. Make sure row cleaners are clearing the residue for the gauge wheels. To do that, measure the width of the row unit from the outside of the gauge wheels, then go to the row cleaners and look to see how far those row cleaners are moving that residue away from where the gauge wheels run. Click to enlarge photo
5. Fill Your Prescriptions
Building an accurate planting map can lead to seed savings because higher populations will be planted in ground that can support it. Prescriptions should rely on yield history, soil type and moisture content so proper populations can be recommended.
6. No Hitch in Seed Depth
If the planter is running too low with the hitch down, the seed will float about a ½-inch up in the bottom of the seed trench. To check if the planter is level, it must be inspected out in the field and while in motion. Have someone else drive the planter, and eyeball it as it runs past.
The 5-by-7- or 7-by-7-inch bar should be level or pitched high in the front. It’s also worth measuring from the ground to the bottom of the 5-by-7- or 7-by-7-inch bar when the planter is in the field. That distance should be 20-22 inches, and the parallel arms should be running relatively straight.
7. Measure Up
Use a tape measure to check the distance between discs and closing wheel assemblies on each row unit. If the rows are on 30-inch spacings, that’s the distance needed between the discs and closing wheels of each unit.
There are planters with spacings of 29, 31 and 32 inches instead of the required 30, and if units aren’t correctly aligned perpendicular to the planter toolbar, it’s more difficult to consistently open and close the seed slot.
A problem that can arise is one or more bent or tweaked row units, especially on outer rows, which is why it’s essential to check the distance between them to make sure they are all correct and consistent.
8. Transfer Your Weight
Transfer just enough down pressure from the frame on parallel links to make sure depth gauge wheels are firmly resting on the soil surface.
Too little pressure results in shallow seed placement, whereas too much pressure needlessly compacts soil near the seed furrow. Be especially aware of “smearing” of the seed-furrow sidewall, which indicates that the soil is too wet to plant.
Too much down pressure or planting in wet soils will result in compacting the seedbed, making emergence and root development difficult. If using an automated down force system, monitor your system and use just enough down force to keep row unit depth wheels in contact with the soil surface, but no more than is necessary.
9. Popping Up
Consider using a starter or pop-up fertilizer on your planter — such as 5 gallons per acre of 10-34-0 — applied in the strip to get plants off to a good start in spring. 2020 Strip-Till Innovator recipients Eric and Megan Wallendal recall one instance where they applied a pop-up fertilizer at-plant in conventional forage corn and ended up having 15-20 acres where the product wasn’t applied. There ended up being a 6-bushel per acre difference in yield which equated to a $3 dollar difference per acre in costs, but a $15 dollar per acre difference in ROI.
“We saw about $22 per acre ROI by using the pop-up product,” Eric says. “It’s good to check our best practices to make sure they are still relevant because even small changes can have a big impact on the bottom line.”
10. Cleaning Up
The goal for row cleaners is two-fold — move residue aside so there’s a good, clean place to plant — and to give the row unit and seed-metering device a better ride. What they shouldn’t do is throw a lot of dirt or be aggressive enough that they’re actually digging a trench.
Make sure row cleaners are clearing the residue for the gauge wheels. To do that, measure the width of the row unit from the outside of the gauge wheels, then go to the row cleaners and look to see how far those row cleaners are moving that residue away from where the gauge wheels run.
If you’re planting into heavy residue, you can run into some issues if they’re not moving that residue far enough and our gauge wheels — which function as your depth control — are running right over the top of that strip of residue. The solution may be switching to row cleaners that have a wider stance or using narrower gauge wheels.
11. Disc Diameter
Sound disc openers are the key to effectively opening the seed slot. Most new planter disc openers are 15 inches in diameter with a ½-inch bevel. When they wear to less than 14 inches in diameter, they should be replaced.
“We try to replace them at least every other year,” says Delhotal says. “We actually like to replace them around 14½-inches. Unfortunately, they might not get to 14½ inches until the middle of the season. So just automatically replace them every other year.”
Openers should be adjusted together by removing spacers behind the hubs to obtain 1 to 3 inches of disc contact. Disc opener contact distance and pressure vary by disc blade thickness and by manufacturer, so be sure to check with the operator’s manual or dealer for optimal settings for your planter.
12. Meter Mastery
Precise placement comes with having well-maintained and accurate seed metering mechanisms and vacuum. Strip-tillers should have their meters inspected every winter to make sure seed drop is accurate and reduce the risk of doubles or triples.
Seed drop isn’t just about release from the plate, it also includes the seed tube. Tubes worn and in disrepair will impact seed drop and placement in the furrow. Seeds need to be placed at the bottom of the V-trench and into good moisture for uniform emergence.
13. Demand Repeatability
An essential element of being able to accurately plant into strips is guidance line repeatability. Strip-tillers can neglect to make sure those guidance lines are present for different tractors they may use for strip-tilling and planting. Test the guidance lines on the planter tractor in the field with a test drive to make sure when that line is recalled in the spring, it is in the exact same position as it was in the fall.
14. Closing Out
For strip-tillers who prefer the spiked closing wheels, using two of them might be too aggressive for certain soil types — to the point they’re actually drying the ground out.
Closing-wheel distance is also critical to closing the seed trench. If they are too narrow, the top will close but there can be an air pocket above the seed. Too wide and the top of the trench won’t close, causing the ground to dry out faster. Check with your closing-wheel manufacturer on this, as the proper distance can range from 1½-2¾ inches.
15. Timing is Everything
Timing is important when it comes to how closely the planter should follow the strip-till rig. With some of the clay soils, you won’t want too much time between strip-tilling and planting. You need to get back out there and get it planted quickly, because it can turn to bricks if it’s left for too long. Ideally, you should consider following with the planter within a single day of a spring strip-till or strip-refreshing pass.
This article was originally published March 2021 and is updated regularly.
Related Content
- 5 Time and Money Saving Tips to Put to Use ahead of Planting: From regularly replacing disc openers to keeping hydraulic hoses elevated and secure, Illinois strip-tiller Dave Delhotal adheres to an annual checklist before putting a single seed in the ground.
- A Strip-Tiller’s Checklist for Productive Planting: In this Strip-Till Farmer podcast, we're joined by veteran strip-tiller Dave Delhotal, who details his annual checklist ahead of planting, along with mistakes made and lessons learned for optimizing equipment and technology performance.
- 2020 Strip-Till Innovators: Megan & Eric Wallendal: Watch our 4-part 2020 Strip-Till Farmer's Strip-Till Innovator video series to hear from the Wallendals on why the phrase “change is constant” is an appropriate one to summarize their ever-evolving strip-till operation.