Starting out in strip-till requires planning, patience and a bit of a sense of adventure. Farmers who have made the transition understand the commitment of time and effort that go into developing a productive, profitable system.
But any strip-tiller will attest that growing pains and failure will be part of the evolutionary process. Custom strip-tilling more than 20,000 acres on 20-25 different soil types during the last 5 years, Elk Point, S.D., farmer Joey Hanson has seen the good, bad and ugly of equipment setups, berm building and fertilization strategies.
In his experience, he’s seen primarily 2 types of strip-tillers — those who want strip-till to succeed and make it work and those who don’t really want to succeed with strip-till, but try it so they can say the tillage system they’ve been using was best.
Growing up, Hanson’s family farm was 100% conventional tillage. But trying to understand the justification for it became a point of frustration. Once he became more active in the farm in 2010, he researched what could be done differently and that’s what led him to strip-till.
“Success comes from trial and error and I’ve done a lot of trial and getting to the point where I can hopefully stay away from some of the error,” Hanson says. “I define insanity as doing the same thing over and over and expecting different results. That’s kind of what conventional tillage became for me. It’s very simple. If you want strip-till to succeed, it will.”
Hanson acknowledges his strip-till success is no accident, largely due to his willingness to learn from his mistakes. Here are three key takeaways he shares on strip-till timing, equipment options and soil-building opportunities based on his strip-till experience.
“If you’re going with a shank or mole knife setup, and the manufacturer tells you that you need 18 horsepower per row, add at least 10% to that total…” — Joey Hanson
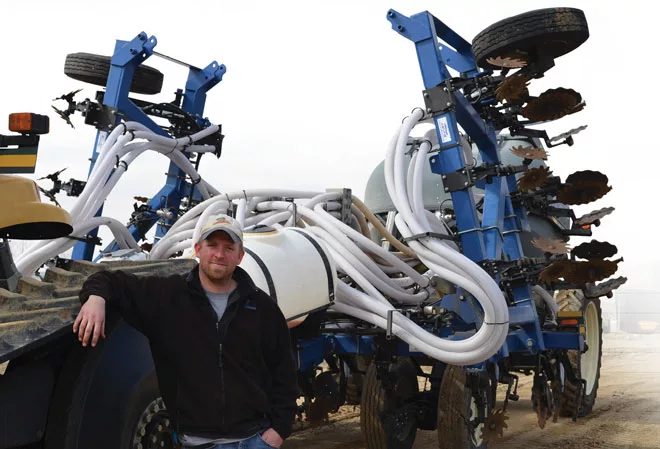
1. One Shot…Maybe Two. “I believe in taking one shot to get strips-built. I’ve got to do it right in the fall, and in my custom business I can’t afford to come back in the spring to freshen up strips. I definitely can’t be coming back 3 days later in the fall to be re-stripping. I spend a lot of time focusing in on my first few days of the season, making sure my strip-till rig is properly set up. I run a 12-row Blu-Jet machine and pull a 9-ton Montag steerable, twin-bin, dry fertilizer cart.
“A question I always get is, ‘How much fertilizer can I save with strip-till?’ Here’s what I tell people: It takes X-amount of units of nitrogen (N) or phosphorous (P) or potassium (K) to raise a bushel of corn. I don’t care if you no-till, conventional till or strip-till. I have actually have started to get farmers to move toward increasing nutrient application and that’s what we’ve done because the utilization and efficiency is so much higher that our return can be a lot higher. Typically, I tell farmers if they want to cut fertilizer, they probably don’t want to strip-till because their mindset is a little different than what the practice is all about. The real question is, ‘What needs to change in my fertility program?’ I think the pH range of the fields I strip-till is 5.2 to 8.2. And some of that variance is in the same field.
“There’s an interaction between different nutrients within the soil and we need understand how they react when banding vs. broadcasting. We band a little bit of N, but I keep my rates pretty low. Usually, we’re putting down P and K, sulfur and zinc, in the fall, which will account for the majority of fertilizer customers apply for the year, except for spring N.”
2. Row Unit Roulette. “Knife, shank or coulter? They definitely all have their fit and I’ve run a lot of the knives and some of the coulters. Coming from heavy conventional tillage where people are used to running rippers and discs and chisels and seeing their grounds black, I knew that running a coulter system 3-4 inches deep wasn’t necessarily going to be a fit for me.
You May Also Be Interested In...
4 Fall Strip-Till Mistakes and How to Avoid them to Improve Productivity
Now is the time to understand — and avoid — costly strip-till mistakes to improve your cropping system. We’ve compiled a handy ‘how-to’ game plan into a special eGuide download — and we’ve made it absolutely FREE to get it into the hands of as many strip-tillers as possible to help each one establish a benchmark for success. Download now »
“I wanted a mole knife or some type of a shank machine. I run a mole knife and in the fall and a mini mole knife in the spring. If you’re going with a shank or mole knife setup, and the manufacturer says you need 18 horsepower per row, add at least 10% to that total. That’s what I’ve learned while strip-tilling through some hillier areas in Nebraska. I have plenty horsepower in the flats, but on the hills, I ran out of horsepower. I had to shallow up, downshift and run a lot slower. The way I have my machine I like to run a certain speed with it, usually about 6½ mph, but I could see the rig change drastically when I slowed down or sped up.
“I had also run a series of coulters and I wanted a little bit more aggressive action in front. Those worked really well if I had a dry fall. However, really wet conditions a few years ago in fall made it difficult to get strips built on 160 acres in heavy clay soils, and my rig paid the price over a 3-day period. It was a nightmare. The strips ended up turning out fine, but what I learned is that when I’d leave one location for another 3 miles down the road, the soil conditions changed, but I didn’t account for that with my rig. On another occasion, I did one 100-acre field for a customer and broke 25 shear bolts, but that was more due to extremely rocky conditions.
“I also tried a smooth coulter during a wet fall a few years ago, and I didn’t find any performance difference from the fluted coulters. I rarely ever plugged the fluted coulter, so that is my go-to coulter of choice. I’ve also tried running a coulter setup intended for spring freshening in corn-on-corn. Where I found success with them was running in spring 2015, but what I didn’t like was some of the clod sizes. I’d been running drag chains forever on my planter, so I found some steel and some old heavy log chains and made my own drag chains for the strip-till rig. It took that refreshing coulter system from so-so to an excellent system.
“I had some of the best compliments ever from farmers that planted onto that double-coulter strip, knowing it was only 3-4 inches deep, and a lot of it was corn on corn. For one customer, I strip-tilled into 225 or 230-bushel corn in spring 2015. No vertical tillage, no nothing — and he went corn on corn again and raised phenomenal corn that fall.”
3. Satisfy Your Soil. “Working depth and speed is significant. In fall, I typically like to go about 8 inches deep to get beneath that man made compaction. In spring, that’s not my focus. I want to be as deep as I need to be to minimize any seed burn or any potential plant injuries with my strip and fertilizer placement, so I’m usually probably 5-6 inches deep, depending on soil type. I also make sure I dig a lot. I have a shovel with me all the time and I dig and make sure I’m not creating any air pockets.
“Soil types and conditions change so drastically for me. I don’t change my machine every time, but I make sure I’m doing as good of a job in the conditions I’m in. There have been times where I’ve needed to wait a few more days to get back into a field because of the soil types. In 2013, a grower wanted me to strip-till two, 80-acre fields right across a dirt road from each other, with very heavy, black soils in both fields. I loaded all 160 acres on my fertilizer cart and figured it would take me a day to get through both fields. It took me 3 days because I had to unplug the row units every pass, usually a minimum of 4-6 rows, and I probably took at least 3-5 years off my life in those 3 days.
“It was my own fault because I was not configured correctly to do heavy, mucky gumbos when it was that wet. I spent more time on my hands and knees trying to tweak and adjust the strip-till machine, but it didn’t matter what I did. The conditions were not right. But that winter, the strips settled and were in decent shape by spring. Since that one situation, I’ve been aware of adapting my machine to accommodate soils and I strip-till 500 or 600 acres for that farmer every single fall and he loves it.”