Planter experts have numerous boxes they encourage producers to check off before they leave the shop for another planting season.
Phil Needham, crop consultant; Keith Wendte, CNH America; and Kip Balkcom, USDA-ARS research agronomist, all provided planter-adjustment and evaluation tips.
These tips apply to both off-season adjustments and adjustments to be made just prior to putting the first seed in the ground.
Maintenance And Repair
Replace disc openers if they're worn by more than 0.5 inches from the original diameter. Diameters should be no less than 13.5 inches. — Wendte
If replacing disc openers, also replace the firming point. — Wendte
PARALLEL TOOLBAR. When the drawbar is leveled, you need to make sure the toolbar is parallel to the ground. In this example, both wings are higher than the center. Ideally, the parallel arms should be horizontal most of the time.
Check for play in the parallel-arm pivot points. Most older planters have excessive play in these points, resulting in the planter unit nose-diving — even when the toolbar is level.
Many times, when wear has reached this extent, replacing bushings won't help because the holes within the parallel arms have become egg-shaped. If you find egg-shaped holes, you may be able to drill out the parallel arms and insert an oversized bushing kit.
If the wear is really bad, you will need to replace the parallel arm assembly. Heavy-duty after-market parallel-arm assemblies are available for most planters. — Needham
Replace the shoe if excessive wear is noted at the side or bottom. — Wendte
Closing discs should be replaced if the diameter measures 7½ inches or less. — Wendte
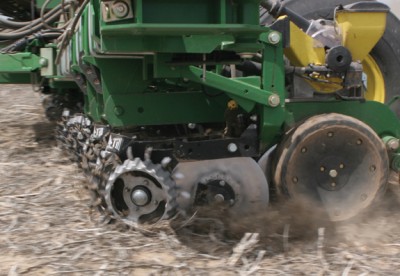
To achieve the most uniform seed placement, make sure all planter drivelines and chains turn freely without jumping or inducing vibration. It may be a rusty chain, a tight bearing or drive, or a poorly aligned wing-drive coupling. Issues like these can have dramatic effects on final seed drops, so spend time spinning the drives to ensure everything turns freely well ahead of planting time. — Needham
Last-Minute Adjustments
The toolbar must be level. This is one of the most important adjustments there is, especially in no-till conditions. — Wendte
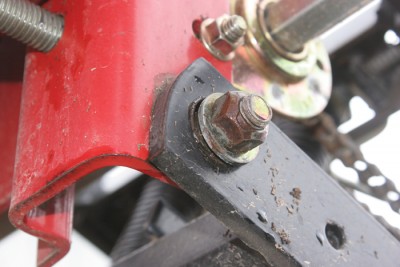
WORN ARMS. In this photo of a Case IH 1200, the parallel arms were so badly worn that the rear of the planter unit could be lifted at least 1 inch when the down pressure was backed off. A trolley jack under the double-disc openers is the best way of determining the play in the pivot points.
Level the planter. Many farmers switch planter tractors or planters and forget the tractor drawbar heights or planter hitch settings may have changed. It's always good to hitch up the planter tractor and take it to a flat area of a field to make sure everything is level or make adjustments.
If the drawbar is low at the tractor end, it causes a number of problems, including causing the no-till coulter to run too deep, causing the row-unit parallel linkage to not run level or causing the seed firmer to not press effectively.
It can also cause the closing-wheel arm assembly (Kinze, White and John Deere) to run downhill, which actually reduces the gathering action, resulting in a poorly closed seed slot.
If the drawbar is high, the consequences are not nearly as bad. But poor soil penetration frequently results on hard ground because the double-disc opener contact point is rotated forward and upward.
Less-than-ideal performance from row cleaners also occurs. — Needham
Once the drawbar is level, look at the angle of the parallel arms on each planter unit. They should be as horizontal as possible, all the way across the toolbar. Depending on how the planter was assembled, the wings may be higher or lower than they should be.
If they're not consistent, most planter-wheel modules have three to five holes to adjust the wing (and center) wheels up or down to help level the toolbar. — Needham
Adjust the row-unit down pressure so that you can just barely turn the gauge-wheel tires with one hand while the planter is in the ground. — Wendte
No-Tillers Share Drill Pointers
Mel Gerber, a Versailles, Mo., no-tiller, says the following five factors have made his John Deere 1890 air seeder a much more consistent performer:
• Adding 2,000 pounds of weight to the wings keeps them better engaged in the ground.
• Maxing out the spring on the seed-firming wheel.
• Replacing the cutting disc before double-crop soybeans after wheat to help slice through tough residue.
• Replacing gauge wheels as soon as they stop wiping the cutting disc cleanly.
• When in the field, Gerber also ignores the John Deere-supplied, down-pressure gauge, increasing pressure until the needle is deep in the red zone.
James Kinder, a no-tiller from Walters, Okla., notes that all John Deere no-till drill openers on 50, 60 and 90 series drills have the same T-handle that fits into the cover slots for depth control.
"We install a short bungee cord to keep the handle from bouncing in the cover slots. This ties the handles up and stops wear immediately," he says.
Keep drill discs in good condition and replace them often for consistent results, adds Murray Thomson, a New Zealand no-tiller.
Make sure there is sufficient downforce on the closing discs to close the trench, and adjust the settings according to your operator's manual. Heavy duty, closing-disc, down-pressure springs may be necessary. — Wendte
Take note of row-unit bounce. Excessive bounce not only adversely affects metering accuracy, but also hinders consistent seed depth.
If excessive bounce is noted, either slow down or correct row-unit down pressure. — Wendte
Toolbar height should be adjusted to 20 inches from the soil profile to the bottom of the toolbar. — Wendte
Consult the operator's manual to adjust the gap between disc openers properly. This is important to achieve a single-disc cutting edge for heavy no-till residue. — Wendte
Recommended Technology And Attachments
Consider row cleaners. Row cleaners operate in heavy cover-crop residue and manufacturers have developed different types to match various planters.
Removing residue reduces the chance of hairpinning it into the seed furrow.
Row cleaners should be adjusted to move residue, but not soil. If too much soil is disturbed in the row, the soil will dry out and can crust, which will hinder emergence.
Disturbed soil can promote weed emergence in the row. — Balkcom
Pneumatic down-pressure kits allow for adjusting down pressure on the go from 0 to 260 pounds. — Wendte
Spoked closing wheels can be helpful in poorly drained or fine-textured soils. Using traditional cast-iron or smooth rubber closing wheels on these soils can result in soil crusting.
Spoked closing wheels crumble the seed trench closed, which provides adequate seed-to-soil contact, but leave the soil loose and friable for plant emergence. — Balkcom
No-till residue managers slice and clear a clean path for the row unit, which is especially helpful in corn-after-corn. — Wendte
In rough soil conditions, a V-slice insert and seed firmer can help ensure adequate seed-to-soil contact. V-slice inserts clean the seed trench created by the opening discs.
Then seed firmers press the seed into the soil at the bottom of the seed trench. These attachments result in additional costs, but can be very beneficial depending in certain soil conditions. — Balkcom
Auto-guidance for the tractor allows the operator to pay attention to planter settings in the field. — Wendte