When the 1980s farm crisis occurred, Harmon Wilts witnessed several farmers sell off their farm machinery and try ridge-tilling to save money. He observed two outcomes from that decision: those who did it because it was the right thing to do for their soils survived and learned about it, while many of those who just did it for economics didn’t make it.
“A lot of this is really about your mindset,” he told fellow farmers at the 2026 National Strip-Tillage Conference in Springfield, Ill. “I’m not going to try this — I will succeed.”
During his conference presentation, Wilts walked through his journey of successfully implementing strip-till on his 1,655-acre farm of corn, soybeans and sugar beets in Kerkhoven, Minn., how he proved it was working and his advice to others looking to make the transition.
Think Through Machinery
Wilts purchased his first strip-till rig and began the transition to strip-till in 2019, but had recognized its potential when he started farming 20 years earlier. Using an anhydrous knife bar as his strip-till machine, he compared it to no-till and conventional ripping across one field. While the strip-till performed well, he realized he needed a better machine that would give him the right depth to make the berms, as well as autosteer.
Fast forward two decades later and both were now readily available. Wanting to protect the soil and preserve the future of farming for his three daughters, Wilts decided it was time to commit to the practice. He decided on Environmental Tillage Systems’ SoilWarrior because it works in 22-inch rows. The decision to be on 22-inch spacing is primarily for his sugar beet crop, but Wilts has also seen it benefit soybeans by providing enough air movement to prevent diseases like white mold, while in corn it offers better weed control due to a quicker canopy.
The SoilWarrior is equipped with coulters to create the berms, which was not Wilts’ first choice.
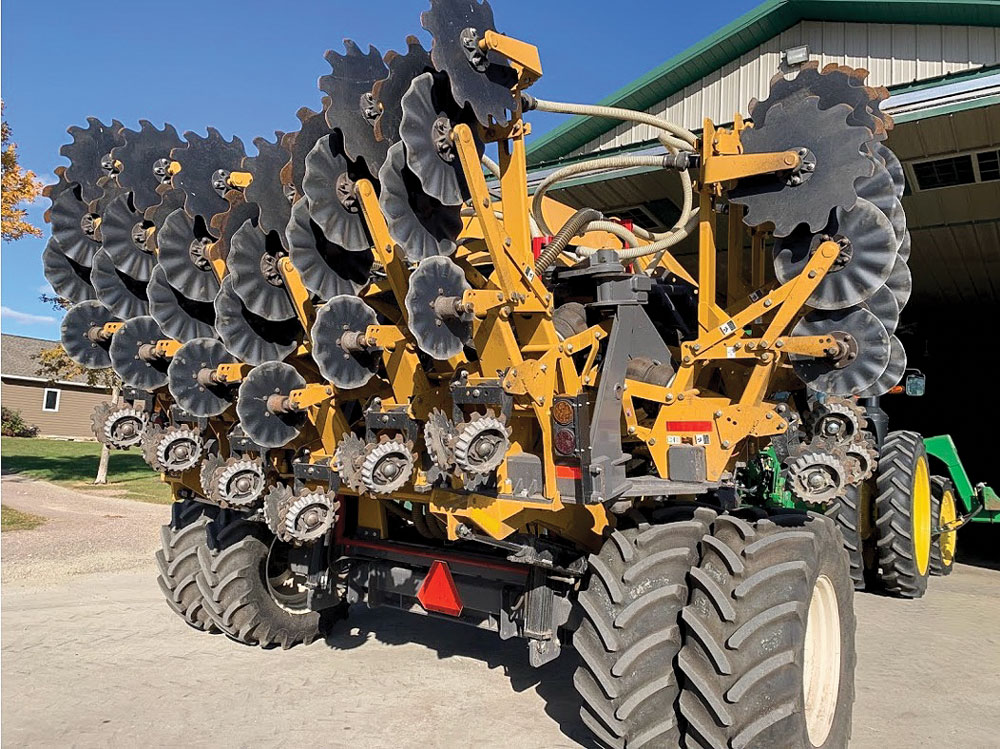
SELECTING A RIG. Wilts went with Environmental Tillage Systems’ SoilWarrior because it fits in his 22-inch row setup. The machine is equipped with row cleaners, coulters and a steerable hitch, and Wilts also runs John Deere’s AutoPath RTK guidance. Harmon Wilts
“I really wasn’t a coulter guy, to tell you the truth,” he says. “I wasn’t really excited about them because I liked the deep stuff.”
But Wilts conducted an experiment comparing strip-tilling with coulters vs. knives. While he thought the knives would be better, he discovered he couldn’t get through the field with them without chopping corn, especially on their narrower rows. Now they always run a Drago corn head they have set to chop the stalks at 10 inches. While “it chops fantastic” when he runs at 3.5 mph, he prefers to drive at 4.2 mph so the residue isn’t chopped as finely.
Even with the corn stalks chopped, Wilts noticed the knives acted “more like a dump rake.” So he took them off and went with the coulters.
He also runs row cleaners on both the SoilWarrior and his John Deere DB44 planter, noting that on the latter they upgraded to pneumatic ones, which have been a “lifesaver to get good stands,” he says.
Both the SoilWarrior and his John Deere DB44 planter have steerable hitches, and Wilts says he wouldn’t go without that on either of them.
Wilts adds that RTK autosteer is also a must. “If you’re not going to spend the money on RTK, don’t strip-till,” he says. “Because you have to plant on the berm or you’ll have reduced yield.”
He uses John Deere’s AutoPath autosteer system, which is built on field boundaries, so he doesn’t have to touch an AB line anymore.
Start Small, Do Side-by-Sides
In his first year strip-tilling, Wilts only strip-tilled two soybean fields that were going to corn. He advises others to take a similar approach of easing into it.
“If you buy a machine and do every single acre in the first year, you’re putting yourself more at risk than I would want because there is a learning curve,” he says.
He also kept one strip of conventional tillage in every field the first 5 years of strip-tilling to get a side-by-side comparison on emergence and yield. First, he would strip-till in his fertilizer across the entire field, then go back and make 6 passes with the ripper in the fall and 3 passes with the digger in the spring.
It helped to keep doubt from creeping in if yields were down one year.
“If you had a bad year on a farm and you have every single acre of strip-till before you do any testing, you’re going to question yourself,” Wilts says. “‘Was that the strip-till? It must have been.’”
“If you’re not going to spend the money on RTK, don’t strip-till…”
For instance, he had one field that yielded 188-bushel corn when their averages are around 215-220. But the yield for the conventionally tilled plot was the same as the strip till.
It can also be an assurance that strip-till is the right direction. Wilts has soil high in pH that can cause iron chlorosis in soybeans. One year he had a field that was particularly bad, but he found the conventionally tilled plot looked even worse.
“If I didn’t do some testing, I would have said, ‘It’s strip-till, we’ve got to move away from that,’” he says.
For Wilts, while there were some yield differences between strip-till and conventional tillage on occasion — some favoring strip-till, others favoring conventional — the plots were usually within 5 bushels of each other and the average yield difference over 5 years was 1.5 bushels better favoring strip till.
“We’re not losing yield. And no side-by-side is perfect,” he says. “So if you can be within 5 bushels on a side-by-side, 2,400 feet long, that’s pretty good data.”
Develop a Fertilizer Plan
One of the bigger adjustments Wilts had to make in transitioning to strip-till was his nutrient management.
When he was conventionally tilling, he would rip in phosphorus (P) and potassium (K) in the fall and then have the co-op apply anhydrous ammonia. In this new system, he’s putting down a dry mix of 25 pounds nitrogen (N), 82 pounds P, 65 pounds K, 21 pounds sulfur and 1 pound of zinc per acre while building strips in the fall for fields going to corn. He then added tanks to his planter so he can dribble on 15 gallons of 28% liquid N per acre behind the closing wheels and he sidedresses another 35 gallons when the corn is about 6-12 inches tall.
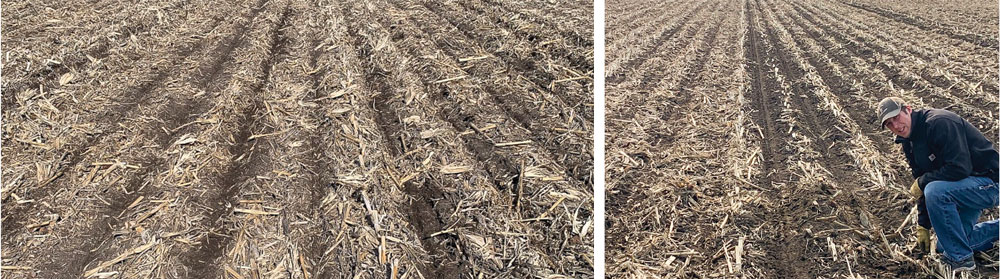
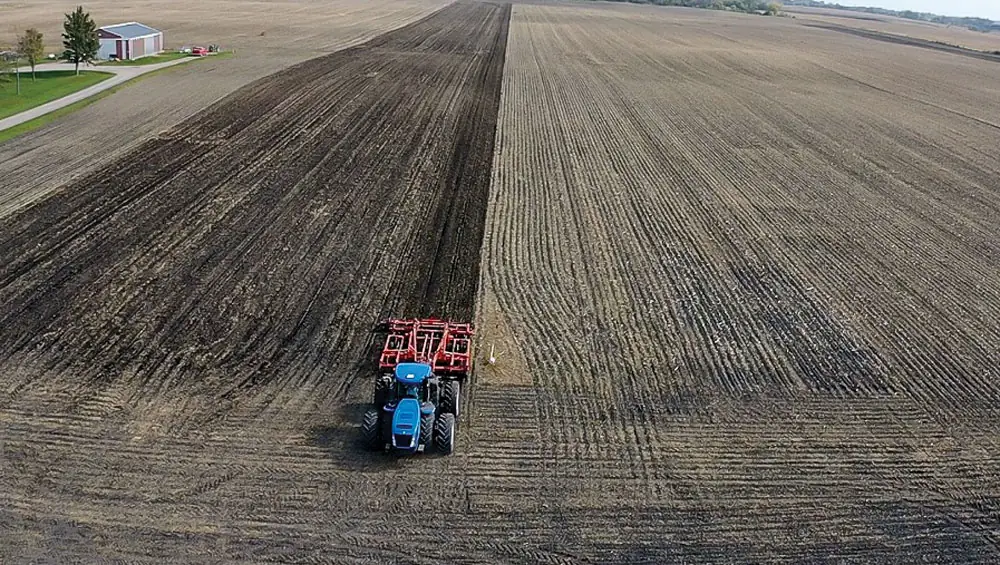
MANAGE RESIDUE FOR BETTER BERMS. Wilts shows a comparison between a field that needs better residue management (L) and a field with ideal residue management (R). Wilts runs row cleaners on both his SoilWarrior and his John Deere DB44 planter. The latter is controlled with pneumatic air to ensure he’s not moving soil with the residue. Harmon Wilts
By putting the bulk of his N on in the summer, he’s applying about 160 pounds total vs. the 180-200 he applied with the former fall-applied system.
Wilts also encourages farmers to consider adopting variable-rate application for their fertilizer. While he didn’t want to lower his fertilizer rate, he needed to in 2025 based on low corn prices and high fertilizer prices. By applying a full rate on his good soils and pulling back in the lower-yielding areas, Wilts was able to reduce his overall application rate by 15% without compromising yield.
“By thinking through some of that, you could have a lot more flexibility,” he says.
Keep the Next Step in Mind
In addition to creating a plan before starting strip-till, Wilts says growers always need to be thinking about the next step when they’re in this system.
That means when you’re combining, you’re thinking about strip-tilling and how the machine is going to get through the residue. Wilts once stopped in the field during harvest leaving a pile of material behind him. While he’s mindful to not do that going forward, he added some extra knives to the combine so the corn is chopped up, leaving the residue even finer.
When he’s strip-tilling, he thinks about planting.
“For us in the fall, the No. 1 priority is building really good berms,” he says. “It’s the lifeblood of the next year.”
“No. 1 priority in the fall is building really good berms. It’s the lifeblood of the next year…”
That means backing into the corners just right and getting right along the edge of the field.
Wilts says he learned early on that when you’re planting on the black strips (berms), the emergence and yield potential are just as good as conventional corn. But if you’re off the berm, you’re going to have a lower stand, the corn will be more yellow and it’s going to hurt your yield.
“If you do it right, you’re going to be so happy in the spring. It’s going to be so much fun planting,” he says. “If it’s not right, it’s going to be a nightmare. You’re not going to be successful.”
Wilts says with RTK autosteer and a good setup, it’s not difficult to build good berms.
“But you need to have somebody that’s just thinking, ‘I’m going to plant.’”