Takeaways
- Understand that liquid N should be incorporated into the soil to maximize effectiveness.
- Consider and compare cover crop interseeding dates and assess results to determine the best window of opportunity.
- Put soil and water infiltration examples to the test on your own farm to build confidence in your system.
Some strip-tillers look for an ‘a-ha’ moment during their initial transition to the practice as they search for visual results that they’ve made a wise decision.
For Dexter, Minn., farmer Ted Frank, his son, Tom, and brother, Ed, this moment came about 2 years and a few hundred acres into their strip-till journey. The Franks initially ran a rented 8-row SoilWarrior from Environmental Tillage Systems in the fall to evaluate the machine’s single deep cog and 2 containment wheels.
Strip-tilling about 50 acres of corn in 2010 and then another 100 acres the following year, Ted says they saw a noticeable difference in their spring seedbed when compared to the decades of deep-ripping they had traditionally done.
“That first spring we had the nicest conditions we had planted in following corn because the root balls were still in the ground, not in the way or rolling around on top of the soil,” says Ted, whose family farms 1,100 acres of corn and soybeans. “We actually had trouble with the navigation controller on our GPS system that spring, so we really didn’t have RTK on the planter. But it just so happened that the rows had a nice, straight row of corn stubble to follow.”
Building Confidence
Convinced the advantages of strip-till would continue to mount, the Franks had permanently parked the plow by 2012, although Ted admits it was intimidating at the time to “think about replacing the horsepower and the iron.”
Their confidence in the decision was further bolstered by an experiment they conducted in summer 2012, based on a soil quality test routinely done by well-known soil health expert Ray Archuleta. The Franks placed dirt samples from both strip-tilled and conventionally tilled fields on their farm into a 5-gallon bucket and simulated a rainfall to compare the structure and stability of the soils.
“With the shovelful of dirt from the tilled ground, the water got cloudy quicker and it didn’t settle out, but the soil from the strip-tilled ground held together better,” Ted says. “The dissolved dirt settled and then the water cleared out quicker. It was a big endorsement that we were heading in the right direction.”
They purchased a 16-row SoilWarrior to match their 16-row John Deere 1770 planter, both of which were initially pulled by a Cat Challenger 55 tractor. They now use their John Deere 8335RT track tractor for strip-till. They had previously run a Versatile 976 tractor to pull a DMI 7-shank ripper, which contributed to using as much as 18 gallons of fuel per hour.
Ted estimates they only use about 1 gallon of fuel per acre for their fall strip-till pass, and about a half-gallon per acre during a refreshing pass in spring.
“That’s been perhaps our biggest financial benefit with strip-till,” he says. “One side benefit is rocks aren’t near as much of a problem as they used to be when we were chisel plowing.”
About two-thirds of their operation is strip-tilled corn, including 150-200 acres of strip-tilled corn-on-corn. The other third is strip-tilled soybeans. Yield consistency — not necessarily improvement — was a motivation for adopting strip-till, and the Franks have achieved their goals in that regard.
They’ve consistently averaged 200-plus bushels per acre for corn and 60 bushels per acre for soybeans. Ted acknowledges that tillage is less of a factor in yield than they had always thought.
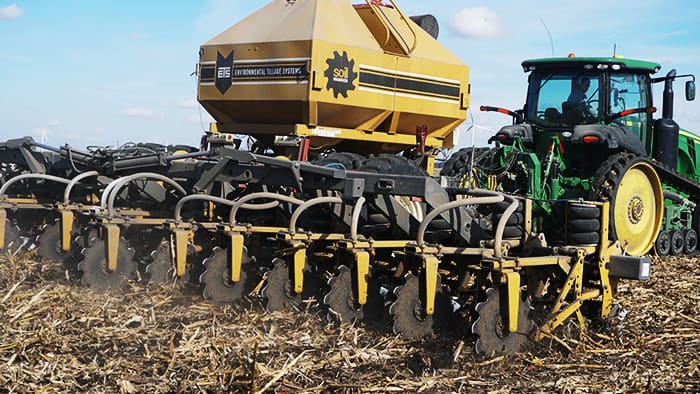
NO GAS GUZZLING. Ted Frank estimates the family only uses about 1 gallon of fuel per acre for their fall strip-till pass, and another half-gallon per acre for a strip-refreshing pass in spring, compared to as much as 18 gallons per hour when they ran a DMI 7-shank ripper. “That’s been perhaps our biggest financial benefit with strip-till,” Ted says.
“Having more moisture late in the season makes a difference in adding a few more bushels or losing less than we would have in the past with conventional tillage,” he says.
The Franks have also seen visible differences in soil structure. One example Ted shares is from 2017 when a 2-inch rain during Labor Day weekend soaked the area and he decided to investigate the impact on a strip-tilled field.
“Later on that afternoon on the same day we got that rain, I walked into the field to check the corn. In the past, I’d sink in a few inches, but other than a little mud on my boots, the soil had absorbed the water,” he says. “Between the soil structure and residue cover, it held together and just looked healthy.”
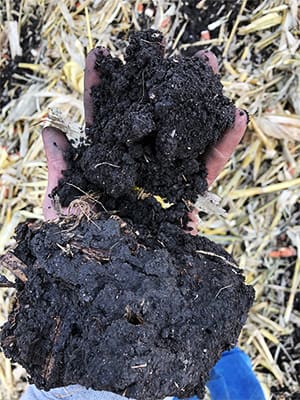
STRONG SOIL. Frank Farms have seen visible differences in soil structure with strip-till. The top clump of soil is from a strip-tilled field, while the bottom clump is from a cultivated area, showing the contrast in structure.
Push & Pull Fertility
While the Franks continue to evolve their overall fertilizer program, they’ve found success with split applications of nitrogen (N) and variable-rate application of potash and monoammonium phosphate (MAP) on corn.
“We work with a couple different crop consultants and use their recommendations, but then we’ve gone with about 70% of their 2-year recommendation going into corn, and then we'll apply a flat rate going into soybeans,” Ted says.
They variable-rate apply a minimum of 35 pounds per acre of MAP and at least 75 pounds per acre of potash for corn, and a flat rate of 35 pounds per acre of MAP and 75-100 pounds per acre of potash for soybeans, banded about 5 inches deep with the SoilWarrior.
With a spring strip-refreshing pass, the Franks apply 108 pounds per acre of urea. Then at planting, they apply another 50 pounds per acre of N, injected on both sides of the row, which includes 12 gallons per acre of 32% N with 3 gallons per acre of ammonium thiosulfate. They also dribble on about 3 gallons per acre of a pop-up fertilizer (6-24-6) in furrow.
“We wanted to apply on both sides of the row, with a little bit of pressure, so we've got a disc that applies on both sides of the row with a zero-degree tip so that the application penetrates the dirt,” Ted says. “We don't want that liquid nitrogen sitting out there, so we open up a crack an inch deep and shoot the fertilizer in.”
They’ve used Yetter’s single wheel fertilizer opener on 4 rows of their planter, and on the other 12 rows, added a stainless steel pipe from Fastenal, plumbed together with a quarter-inch pipe and TeeJet tips on the row units.
“We know liquid nitrogen should be incorporated and that's what we want to do. We don't want to put that money out there and not protect it…”
“The reason we tried the Yetter system is because we know that liquid nitrogen should be incorporated a little bit and that is what we want to do,” Ted says. “We don’t want to put that money out there and not protect it. We also considered mounting a disc further up on both sides of the row unit, but it seemed like a more cumbersome setup.”
The Franks have run the same planter since 2002, albeit with several modifications. In 2016, they added Precision Planting’s DeltaForce downforce control, to go with the eSet spacing system, which they’ve had since 2009. They also added Keeton seed firmers with Exapta Mojo Wire stiffeners in 2017 to add pressure to the firmers.
“We also added Exapta’s Valion seed tube guards between the disc openers. They prevent blade flex and pinched furrows and provide more consistent seed depth. They are thicker than the OEM guards and hold the blades out a bit more so the seed can get to the bottom of the V in the seed trench,” Ted says. “We wrestled with whether we could make seed firmers work for a long time because we always thought our ground is too sticky and they would drag seed, but they work really well.”
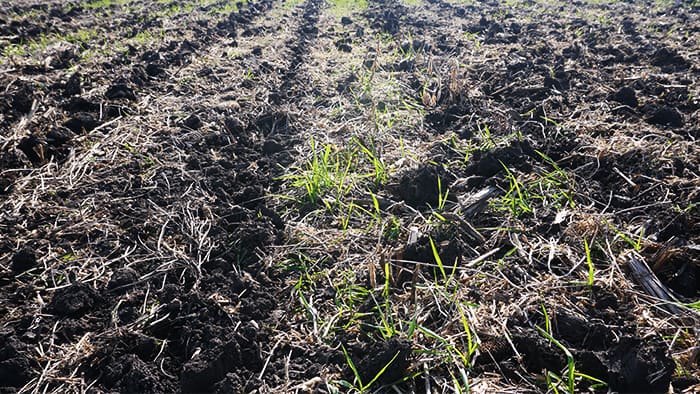
GETTING COVERED. Cover crops continue to be an area of experimentation for Frank Farms. In 2018, they had a mix of cereal rye, radishes and oats interseeded with a Hagie highboy into about 300 acres of soybeans.
They utilize Deere’s StarFire 2 receiver for RTK on their strip-till rig, and utilize a 2630 display in the 8335 tractor. Ted jokes that one of the easiest modifications they’ve made to their planter is taking the markers off, relying on their guidance system to accurately plant on the strip.
Cover Crop Conditioning
In 2013, the Franks had a large number of prevented-planting acres and took the opportunity to experiment with cover crops, seeding radish, pea and Austrian winter pea.
“Having more moisture late in the season makes a difference in adding a few more bushels or losing less than we would have in the past with conventional tillage…”
They also enrolled in the NRCS Environmental Quality Incentives Program (EQUIP) in 2017, and had a mix aerially applied to end rows on some additional acres but saw uneven success in germination. They purchased a Valmar air seeder, mounted it to the toolbar they sidedress with and interseeded annual ryegrass into corn between V8 and V10.
Ted recalls less-than-ideal circumstances for the experiment.
“We had hoped to get into the field about V6 stage, but the machine arrived later than we expected,” Ted says. “We had to use an auger to get seed in the box because the cover crop seed wagon couldn’t reach it. On top of that, there was a storm coming in and we ended up getting into the field in the middle of the night with 30-mile-an-hour winds and the lightening flashing. But we did it.”
The Franks ended up with decent emergence, but a cool fall stunted growth and they suspect the cold, damp spring didn’t allow for a revival of the annual ryegrass. They've consulted with Austin, Minn., no-tiller and strip-tiller Tom Cotter on cover crop seeding strategies to see if they could find a more effective method.
Sizing Up Corn-on-Corn Residue Management
Strip-tilling a few hundred acres of continuous corn on their Dexter, Minn., operation, Ted Frank, his son Tom and Ted’s brother, Ed, have rotated through several residue management options — some more successful than others.
The Franks have run the same Gleaner R65 combine for 11 years but have tested different attachments on their 8-row International Harvester 2208 corn head.
“It’s got knife rolls, but it’s a 2005 model so there’s not a lot of chopping being done by those corn heads anymore,” jokes Ted. “In 2012, we added Yetter Stalk Devastators, which have helped quite a bit because they make sure the corn-stalk butts are rolled with the row. Otherwise we’ve seen stalks laying every which way, which was a lot messier.”
The Franks also utilize floating row cleaners on their 16-row Environmental Tillage Systems SoilWarrior strip-till rig, and row cleaners on their 16-row John Deere 1770 planter.
Ted acknowledges the attachments are effective, if not ideal for their corn-on-corn acres. “The row cleaners throw a piece of residue out of the way now and then, but even with our corn following soybeans there’s still some of that residue from the previous corn crop,” Ted says. “So there can be a piece of stalk that's laying crossway that a plant has to either push around or struggle through.”
A new residue-management strategy they used in spring 2018 on about 20 acres of corn on corn was grazing cattle ahead of a spring strip-till pass.
“My sons have 12 cow-calf pairs and we’ve got 20 acres with a hot wire and we put the cows out there. We skipped the fall strip-till pass and made one pass in spring to apply P, K and urea,” Ted says. “That's the only tillage the field got, and it was probably the best stand we've had or one of the best corn-on-corn stands we’ve ever had. The cows did quite a bit of work on that residue.”
“We were thinking about drilling in cereal rye with a little bit of radish and oats as soon as we harvested soybeans, but we didn’t because it got too late,” Ted says. “We knew someone with a Hagie interseeder who ended up seeding covers into soybeans for us on about 300 acres once the plants started to drop leaves.”
One soybean variety was still too bushy to interseed into, so the Franks had that field aerially seeded and there was a noticeable difference in the cover crop stand vs. the interseeded. This gave them valuable information about proper seeding dates.
“We had the cover crop mix interseeded on about Sept. 10 and then had a rainy spell that pushed back the aerial application,” Ted says. “It was probably at least 10 days and maybe 2 weeks later that the cover crops were flown on.
“It was there, but the stuff we got interseeded took off a lot better, so I think if we can get cover crops seeded from about Labor Day to Sept. 10, that’s our best window.”