Editor's Note: We dug deep into the archives for this article that was originally published in No-Till Farmer in 2002. Cliff Roberts was inducted into the Strip-Till Farmer Hall of Fame Aug. 1 at the 2025 National Strip-Tillage Conference in Iowa City.
Strip-Tilling since 1987, Cliff Roberts has learned a lot about what does and doesn’t work on his farm near Kentland, Ind.
One thing that Roberts has learned is that fall strip-tillage provides a little more margin for error than its spring counterpart. He does not recommend spring strip-tilling any deeper than you intend to plant seed and also advises against using spring-applied anhydrous in the strips ahead of corn. “It’s been done, but it’s also failed big time,” he says.
The key to strip-tillage, says Roberts, is fooling corn into thinking that it is growing in a tillage environment. “That’s what the strip is. We’re working a strip just wide enough to run the no-till planter down through,” he says.
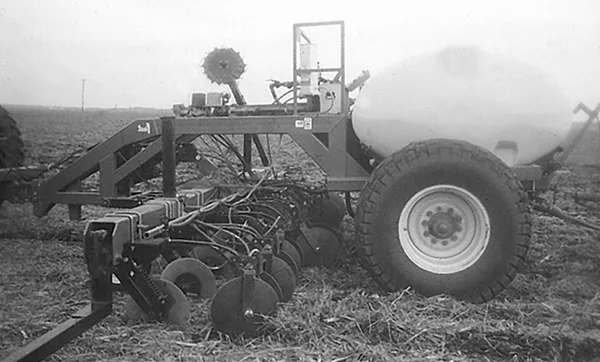
Over the years, the Indiana strip-tiller has experimented with different equipment. He purchased flat markers that were designed for a John Deere planter. He also used an 11-shank DMI applicator borrowed from his local cooperative. But after 2 years, Roberts determined the combination of 11 shanks on a strip-till unit, an 8-row planter and a 6-row corn head on the combine would just not work.
Keep It Simple
“Even with row markers, I couldn’t make it happen,” he says. “I’d start out right on one side of the field. But by the time I got to the other side, I was totally out of whack.” Next, he built a toolbar strip-till unit out of an old chisel plow that cost next to nothing. He also spent $100 for a coulter setup, $40 for a C-shank knife and $80 to $85 for a set of 13-inch diameter disc sealers. The row markers ran about $800 and he also had to buy a tongue for the unit.
“You want to keep it simple — a coulter, a knife and a disc sealer,” he says.
Roberts’ objective is to take the soil, lift it up, build a strip-till mound and then put it all back in place, including the crop residue. This is especially important in areas that are prone to soil erosion from strong winds. “If you’re on rolling ground, you also want some residue on top (of the strip) to keep soil intact during the winter,” he says.
Under the right conditions, the Indiana strip-tiller got this unit to work even with an antiquated knife, small sealer and a coulter. It did, however, depend on the amount of residue (depending on the particular soybean variety) and soil conditions (wet or dry).
“This dictated how large a mound we got,” says Roberts, adding that it was a task to make all of this work. At the time, he was spreading phosphorus and potassium on the surface.
Roberts decided to go a little bigger in 1994 while injecting phosphorus and potassium. He went from a mounted toolbar to a pull-type applicator with up to 5 tons of fertilizer hanging off the back. Yet the fertilizer caddy was not an effective design.
“It had negative tongue weight when I lifted the toolbar and positive tongue weight when I put it down,” he says. “As the fertilizer hopper got lighter, I had a tough time with traction. I also couldn’t see anything so I had to invest in mirrors to see if I had broken a shank or knife bolt.”
At the time, Roberts was using an 8-row planter with a 12-row strip-till applicator. He could not shut off the four extra rows because the unit had an auger underneath which dropped fertilizer into the air stream. So he put a splitter in the extra four rows and dribbled extra phosphorus and potassium on the surface. While he used this system for 3 years, he disliked it because he could not see the toolbar.
Roberts then switched to a Fast brand of machine designed to inject dry fertilizer into the sides of the strip-till ridges. Since it was not built for use with C-shanks and did not have enough height, Roberts raised the axle to get the needed amount of height for the sealers and C-shanks. This worked much better because the toolbar was located in front of the dry fertilizer hopper, says Roberts.
However, Roberts is ready to sell this dry-fertilizer system. “I didn’t see a return on my investment for injecting phosphorus and potassium,” he says.
Fertility Lessons
No matter what amount of fertilizer Roberts used, the yields were not enough to make the dry system pay on his farm. The inconvenience of the dry fertilizer, he says, is another reason for having a “for sale” sign on the applicator. Another problem was that he didn’t have his own fertilizer tender and had to rely on the time schedule of his fertilizer dealer’s labor. This often meant that he could not do late-night fertilizer application.
Roberts experimented with anhydrous ammonia before going with dry fertilizer. He then moved to a combination of dry fertilizer and anhydrous ammonia, then to a combination of liquid fertilizer and anhydrous ammonia. “The liquid didn’t pay any more than the dry,” he says, adding that in his area, liquid fertilizer is more expensive and that he still did not see a yield response that was enough to pay for the added expense of injecting phosphorus and potassium.
Over the last 2 years, Roberts has placed no fertilizer in his strips. “I’m still getting warmer, dryer soil in the strips, but there’s no fertilizer in them,” he says. “I didn’t see the deep injection paying off.”
Mole Knife Is Essential
While Roberts believes it disturbs too much soil during sidedressing, a mole knife has worked well in his fall strip-till program. The advantage of using a mole knife is that it keeps nitrogen at the bottom of the knife slot.
“It’s better than a standard anhydrous knife,” says Roberts. “Sealing the gas in the ground and the mound height are the two biggest reasons for using the mole knife.”
The mole knife has a foot that is 1 1/2 inches wide and is raised about 1 1/4 inch. It helps build a good mound regardless of whether soil conditions are wet or dry, says the veteran strip-tiller. The slower you run the unit, the better mound that you will get, says Roberts, adding that he can build mounds as high as a foot tall while running across the field at 3 to 4 mph.
Roberts has found that too much speed can cause the knife and shank to snow plow and that tends to throw soil too far. “It can also allow uncut residue to build up around the C-shank and your disc sealers don’t work properly, especially in wet conditions,” he says. Instead, he prefers to use 18-inch-diameter, smooth-blade disc sealers, and says that older brackets can be lengthened to add the blades. Roberts has found smooth blades work especially well in rolling soils. He does not run any springs on them because they cut into the soil.
Stay On Top Of Things
Roberts tries to stay on top of the mound when no-tilling in the spring. “I run a stabilizing coulter on the no-till planter frame, although it’s still tough to keep it on top,” he says. While he has used a video camera for guidance when strip-tilling, it has not worked on sunny days because of reflections from the sun.
The strip-tiller also tends to wipe a lot of residue away in the spring, but cautions others not to wipe too much soil or they will be “planting in a ravine.”
If you inject fertilizer in 30-inch wide rows, Roberts recommends moving over 15 inches from where you applied fertilizer the previous year. If you are having someone do soil sampling, he also recommends that you advise them about what you are doing.
“If you can’t always stay over 15 inches and are injecting a lot of fertilizer in one spot and the soil sampler is probing in that spot, your fertility levels are going to be high,” he says.
How do yields compare between no-till and strip-till? You can have anywhere from a 0 to 50-bushel per acre yield increase with strip-till, says Roberts, suggesting that it is dependent on various factors.
The key, as noted previously, is getting the corn to think it is growing in a tilled environment. Strip-tilled corn may emerge a little later than conventionally tilled corn, but it may also help one avoid the dragging effect that cooler, wetter soil can have on no-tilled corn.